Zenifer - Minimal and Creative Responsive HTML5 Template

When you purchase our theme. You can download Theme files from Downloads page. Navigate through your purchased items.
-
Download your purchased item and you will get the
theme-file.zipinto the theme file. You can use that file for your work. -
Documentation - Contain theme documentation file.
-
Licensing Folder - Contain all licensing info files.
-
development-file. I made this using gulp and scss. If you want to use gulp, you can run.
Free Theme Support
Attention Please
All of our products come with free support and currently we handle all support questions through Our Support Facebook Group [recommended for fast support].
You can also mail us for support electronthemes@gmail.com
Support includes
- Responding to questions or problems regarding the item and its features
- Fixing bugs and reported issues
- Feature Request
- Providing updates to ensure compatibility with new software versions
Item support does not include
- Customization and installation services. ( You can ask paid support )
- Support for third party software and plug-ins
Included Files & Sources
You will get 5 unique homepage, 45+ pages and a lot of components for uses.
Zenifer
│   Documentation
│   Theme-file
│   │   .html
│   │   mail.php
│   └───assets
│       │   css
│       │   fonts
│       │   img
│       │   js
│       │   scss
How to run the file?
You will get the theme-file.zip in the downloadable files. Open it on the localserver like localhost or 127.0.0.1:8080. To run I use live-server node package. Install from here: Live Server. You must have node installed in your computer
If you don’t use localserver, some images may be broken or too big
How to run development-file?
We made this HTML using gulp and SCSS. You must have installed Node and some node package globally like gulp and sass
- To install node, download package from here: https://nodejs.org/en/download/
- Install gulp globally:
npm install gulp-cli -gand then checkgulp -v - Install sass globally:
npm install sass -gand then checksass --version - Install live-server globally:
npm install live-server -gand then checklive-server -v
Included Stylesheets:
<!-- CSS FILES -->
<link rel="stylesheet" type="text/css" href="assets/css/bootstrap.min.css" />
<link rel="stylesheet" type="text/css" href="assets/css/components/component.css" media="all" />
<link href="https://cdn-images.mailchimp.com/embedcode/classic-10_7.css" rel="stylesheet" type="text/css">
<link rel="stylesheet" type="text/css" href="assets/css/style.css" media="all">
Included JavaScript:
<!-- JQUERY JS -->
<script src="assets/js/jquery-3.3.1.min.js"></script>
<!-- JQUERY-MIGRATE.MIN JS -->
<script src="assets/js/jquery-migrate.min.js"></script>
<!-- POPPER.JS JS -->
<script src="assets/js/popper.min.js"></script>
<!-- BOOTSTRAP.MIN JS -->
<script src="assets/js/bootstrap.min.js"></script>
<!-- CAROUSEL JS -->
<script src="assets/js/owl.carousel.min.js"></script>
<!-- ISOTOPE JS -->
<script src="assets/js/isotope.pkgd.js"></script>
<!-- IMAGESLOADED JS -->
<script src="assets/js/imagesloaded.pkgd.js"></script>
<!-- MAGNIFIC-POPUP JS -->
<script src="assets/js/jquery.magnific-popup.min.js"></script>
<!-- WAYPOINTS.JS  -->
<script src="assets/js/jquery.waypoints.js"></script>
<!-- COUNTERUP JS -->
<script src="assets/js/jquery.counterup.min.js"></script>
<!--GOOGLE MAP API-->
<script src="https://maps.googleapis.com/maps/api/js?key=AIzaSyCn4uayw359fjMh4P9i2rKKZYHzXaqTRNs"></script>
<!-- FITVIDS JS -->
<script src="assets/js/jquery.fitvids.js"></script>
<!-- JQUERY-JVECTORMAP JS -->
<script src="assets/js/jquery-jvectormap.min.js"></script>
<!-- JVECTORMAP-WORLD-MILL.JS -->
<script src="assets/js/jquery-jvectormap-world-mill.js"></script>
<!-- PROGRESSCIRCLE JS -->
<script src="assets/js/progresscircle.js"></script>
<!-- PAROLLER JS -->
<script src="assets/js/jquery.paroller.min.js"></script>
<!-- WOW JS -->
<script src="assets/js/wow.min.js"></script>
<!-- slicknav JS -->
<script src="assets/js/jquery.slicknav.min.js"></script>
<!-- TILT JS -->
<script src="assets/js/tilt.jquery.min.js"></script>
<!-- Countdown JS -->
<script src="assets/js/jquery.countdown.min.js"></script>
<!-- vegas JS -->
<script src="assets/js/vegas.min.js"></script>
<!-- kinetic JS -->
<script src="assets/js/kinetic.js"></script>
<!-- final JS -->
<script src="assets/js/jquery.final-countdown.min.js"></script>
<!-- SELECT2 JS -->
<script src="assets/js/select2.min.js"></script>
<!-- Instagram js -->
<script src="assets/js/jquery.instagramFeed.min.js"></script>
<!-- CUSTOM SCRIPT JS -->
<script src="assets/js/scripts.js"></script>
Block Section
World Map
You can find it into script.js file.
/////////////// 11. World map ///////////////
    if ($('#world_map').length) {
        $('#world_map').vectorMap({
            map: 'world_mill',
            normalizeFunction: 'polynomial',
            hoverOpacity: 0.9,
            hoverColor: false,
            regionStyle: {
                initial: {
                    fill: '#e3eaef',
                },
            },
            markerStyle: {
                initial: {
                    r: 9,
                    fill: '#666ce0',
                    'fill-opacity': 0.95,
                    stroke: '#fff',
                    'stroke-width': 7,
                    'stroke-opacity': 0.4,
                },
                hover: {
                    stroke: '#fff',
                    'fill-opacity': 1,
                    'stroke-width': 1.5,
                },
            },
            backgroundColor: 'transparent',
            zoom: false,
            zoomOnScroll: false,
            markers: [
                {
                    latLng: [31.230391, 121.473701],
                    name: 'Shanghai',
                },
                {
                    latLng: [39.904202, 116.407394],
                    name: 'Beijing',
                },
                {
                    latLng: [28.70406, 77.102493],
                    name: 'Delhi',
                },
                {
                    latLng: [6.524379, 3.379206],
                    name: 'Lagos',
                },
                {
                    latLng: [39.343357, 117.361649],
                    name: 'Tianjin',
                },
                {
                    latLng: [24.860735, 67.001137],
                    name: 'Karachi',
                },
                {
                    latLng: [41.00824, 28.978359],
                    name: 'Istanbul',
                },
                {
                    latLng: [35.689487, 139.691711],
                    name: 'Tokyo',
                },
                {
                    latLng: [23.12911, 113.264381],
                    name: 'Guangzhou',
                },
                {
                    latLng: [19.075983, 72.877655],
                    name: 'Mumbai',
                },
                {
                    latLng: [40.7127837, -74.0059413],
                    name: 'New York',
                },
                {
                    latLng: [34.052235, -118.243683],
                    name: 'Los Angeles',
                },
                {
                    latLng: [41.878113, -87.629799],
                    name: 'Chicago',
                },
                {
                    latLng: [29.760427, -95.369804],
                    name: 'Houston',
                },
                {
                    latLng: [33.448376, -112.074036],
                    name: 'Phoenix',
                },
                {
                    latLng: [51.507351, -0.127758],
                    name: 'London',
                },
                {
                    latLng: [48.856613, 2.352222],
                    name: 'Paris',
                },
                {
                    latLng: [55.755825, 37.617298],
                    name: 'Moscow',
                },
                {
                    latLng: [40.416775, -3.70379],
                    name: 'Madrid',
                },
            ],
        })
    }
Contact Form
The Contact Form fully dynamic . You can change your email address from the mail.php file.
Here is the html markup:
<form action="mail.php" method="POST">
    <input class="form-control" name="name" type="text" placeholder="Name" required>
    <input class="form-control" name="email" type="text" placeholder="Email address" required>
    <input class="form-control" name="subject" type="text" placeholder="Subject" required>
    <textarea class="form-control" name="message" id="validationTextarea" name="message" cols="10" rows="4" placeholder="message" required></textarea>
    <div class="submit-btn mt-30 text-right">
        <button type="submit" name="submit" class="btn btn-sm rounded">Send Message</button>
    </div>
</form>
Here is the mail.php code. You can change you email address. Replace your mail address to this line define( "RECIPIENT_EMAIL", "electronthemes@gmail.com" );
<?php
// Naming Constant
define( "RECIPIENT_NAME", "Electron Themes" );
define( "RECIPIENT_EMAIL", "electronthemes@gmail.com" );
// Values
$success = false;
$senderName = isset( $_POST['name'] ) ? preg_replace( "/[^\.\-\' a-zA-Z0-9]/", "", $_POST['name'] ) : "";
$senderEmail = isset( $_POST['email'] ) ? preg_replace( "/[^\.\-\_\@a-zA-Z0-9]/", "", $_POST['email'] ) : "";
$subject = isset( $_POST['subject'] ) ? preg_replace( "/[^\.\-\' a-zA-Z0-9]/", "", $_POST['subject'] ) : "";
$message = isset( $_POST['message'] ) ? preg_replace( "/(From:|To:|BCC:|CC:|Subject:|Content-Type:)/", "",
$_POST['message'] ) : "";
// Send the email
if ( $senderName && $senderEmail && $message ) {
  $recipient = RECIPIENT_NAME . " <" . RECIPIENT_EMAIL . ">";
  $headers = "From: " . $senderName . " <" . $senderEmail . ">";
  $success = mail( $recipient, $subject, $message, $headers );
  //Set Location
  header('Location: homepage.html');
}
?>
Instagram Feed
To show your instagram feed, just use username of your instagram account. You will get this code in the scripts.js file.
$.instagramFeed({
    'username': 'electronthemes',
    'container': "#instafeed",
    'items': 6,
    'display_gallery': true,
    'styling': true
});
Newsletter
For newsletter we have used mailchimp. Just create a form from your mailchimp account and just replace the action code with newly created form’s action code. Here is the form code:
<div id="mc_embed_signup" class="subscribe-form">
<form action="https://facebook.us16.list-manage.com/subscribe/post?u=68ee4c3633ca11143594f679b&id=602d19eb3a" method="post" id="mc-embedded-subscribe-form" name="mc-embedded-subscribe-form" class="validate" target="_blank" novalidate>
<div id="mc_embed_signup_scroll">
<div class="mc-field-group">
<input type="email" value="" placeholder="your email address" name="EMAIL" class="required email form-control" id="mce-EMAIL">
<button type="submit" name="subscribe" id="mc-embedded-subscribe" class="button"><i class="fa fa-paper-plane-o"></i></button>
</div>
<div id="mce-responses" class="clear">
<div class="response" id="mce-error-response" style="display:none"></div>
<div class="response" id="mce-success-response" style="display:none"></div>
</div>
<div style="position: absolute; left: -5000px;" aria-hidden="true">
<input type="text" name="b_68ee4c3633ca11143594f679b_602d19eb3a" tabindex="-1" value="">
</div>
</div>
</form>
</div>
<!--End mc_embed_signup-->
Here is the screenshot that part you need to change.
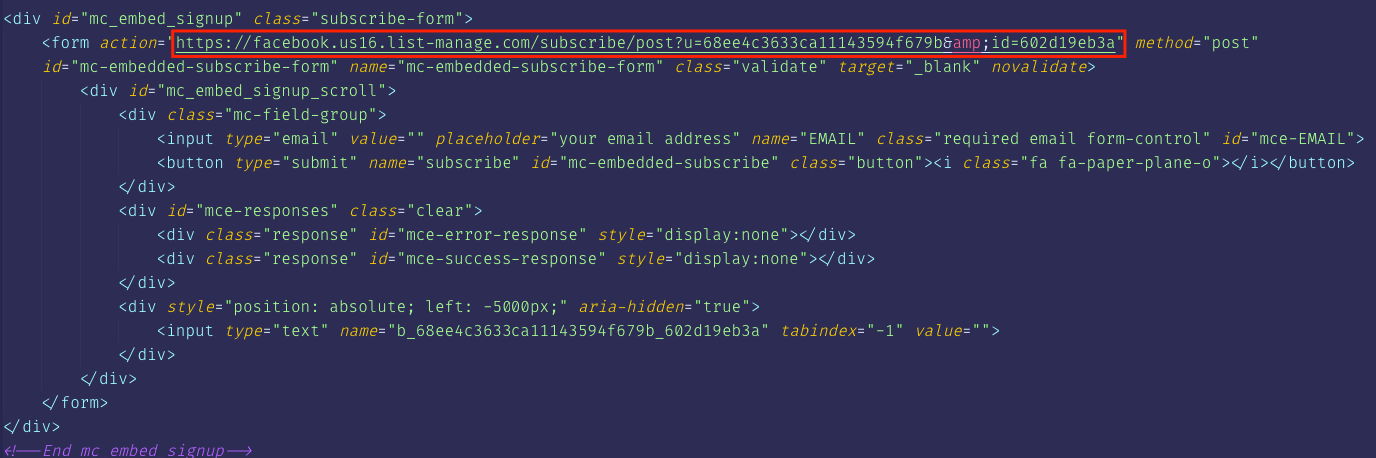
Here is the tutorial how to create form: subscribe form
Navbar
- Fixed Navbar -
If you want to Fixed your navbar please use ‘fixed-nav’ class . Follow the below image instraction :

- Transparent Navbar -
If you want to Transparent your navbar please use ‘transparent-navbar’ class . Follow the below image instraction :

- No Fixed Navbar -
If you want to No Fixed your navbar please use ‘no-fixed-navbar’ class . Follow the below image instraction :
